Saturday, February 25, 2012

Iced Sugar Cookies

This week we had a baby shower for a co-worker, who is expecting a sweet, baby girl.

The organizer had planned for a fun activity during the party; decorating onesies. She had iron on fabric and stencils, along with fabric pens, plenty of plain onesies, and an iron - hot and ready to go. We made some cute little outfits for the mommy-to-be to take home.

I signed up to make desserts, and wanted to bring something that would coordinate....onesie cookies.

The new baby is named, Lucy, and we had a, "We Love Lucy" theme, with red and white....so I iced the cookies to match.


These days, you can get cookie cutters in about every shape imaginable. What you dont find in the stores, you can order online.... perfect for any celebration.

Years ago I tried different recipes, trying to find the best for cookie cutters. I found one that is fantastic, the dough doesnt spread AT ALL...making it ideal for even the most detailed designs.

I wish I could give credit to the source, but I just have this scribbled onto a card in my recipe box...but I owe a lot of "thanks" to the person that posted this;

6 cups flour
3 tsp. baking powder
2 cups butter
2 cups sugar
2 eggs
2 tsp. vanilla extract or desired flavoring (I like almond myself)
1 tsp. salt

Cream butter and sugar until light and fluffy. Add eggs and vanilla. Mix well. Mix dry ingredients and add a little at a time to butter mixture. Mix until flour is completely incorporated and the dough comes together.

You should have a ball that looks like this:
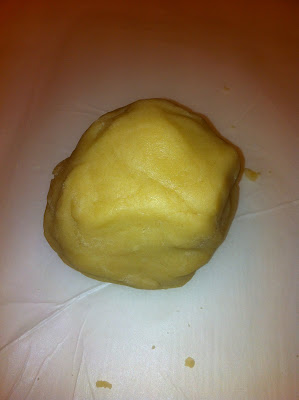


Roll to desired thickness and cut into desired shapes. Bake on ungreased baking sheet at 350 degrees for 8 to 10 minutes or until just beginning to turn brown around the edges. This recipe can make up to 5 dozen, 3" cookies.

It is best to cut out the designs after the dough has been refrigerated.

One trick that I have found, is to put some of the dough between two pieces of parchment paper, BEFORE REFRIGERATING and roll it out to the desired thickness.


It's much easier to roll when it is soft, and also it wont stick when it is between the paper. Then, after it is flat, you can refrigerate it.

After the dough has chilled, take it out.....


Use your cutter to start making shapes......


They dont take long to bake, so you will want to keep an eye out for them, and pull them out just when the edges start to brown.


Once the cookies have completely cooled, you can ice them. I use royal icing, as it hardens up nicely. I make 2 batches per color; one a little bit thicker for tracing around the edges....


and a second batch that is just a tiny bit thinner, for filling in the cookie.....


The easiest, and neatest way to frost them, is using plastic bottles. I bought a bunch of them at the craft store, and get a lot of use out of them. During the holidays you can fill them with different colors of frosting and let the kids decorate cookies....

I prefer the smaller bottles, as you can make fine details nicely.


Once the icing has been filled in, you can add embellishments. I used candy pearls to accent the red cookies, and red hots as buttons on the white.


When the icing is completely dry, you can use the thicker frosting to add additional accents, as I did here with the arm sleeves and leg holes.


These cookies make great party favors and gift accents too....and because the royal icing hardens, they wont smudge in plastic treat bags.


I hope this inspires you to make these cookies for your next party!

Friday, February 24, 2012

Floral Bouquet Cake

A couple of years ago, I was fortunate enough to meet a talented chef online, her name is Gigi and she owns, Kids Culinary Adventures, in Northern California. I encourage you to like their facebook page; Kids Culinary Adventures Facebook Page And, if you are in the bay area, they do kids classes and lots of fun activities, so check them out.

Gigi had the most amazing cake displayed, and I decided to make one for a birthday party for co-workers.

First, let me show you my end result, and then we can go step-by-step.


I stacked a two-tiered cake, and put "planks" of chocolate around the edges. They are affixed with frosting, but the pretty ribbon also keeps them in place. The finishing touch is the bright bouquet on top. It almost looks too fancy to eat. Gigi was so creative to come up with this beautiful design.....it's my favorite "pretty cake"

Baking the cake was easy....you can make any size you want. In fact, for Mother's Day in 2010, we made mini versions out of cupcakes at my baking class. This time, I used two, 6 inch cakes.

First step is to grease and flour your pans, so you can remove the cake easily.


Pour the cake batter into the pan, making sure it is evenly divided between your pans.


While your cakes are baking, you can temper your chocolate.

Tempering is the process of heating and cooling, at precise temperatures, so that the chocolate ends up with a hard, shiny shell. This does not work by melting and cooling, at least not with real chocolate. You can always temper by hand (which is time consuming and a fickle process), you can use fake chocolate (which you can warm up and cool in the fridge), or you can get a tempering machine. I use my tempering machine often, it's the size of a shoe box, and is quick and easy. I have other pictures and videos on this site, if you want to learn more about tempering.

I tempered white chocolate, and then, using a fork, drizzled it onto parchment paper.


It's important to let the chocolate cool and set up, before adding another chocolate layer. I tempered dark chocolate, and then spread it out onto the drizzled white chocolate. I did my best to make the level of thickness even.


After about 10 minutes, the chocolate started to harden, and that is the time to use a knife to score the "planks". When I first spread the chocolate, it was shiny, but as it starts to harden, it becomes matte, and that is when you want to cut it. If you wait too long, you will crack the chocolate strips.


When you stack your cakes, make sure that you use a generous portion of frosting along the side. I actually like to frost as I go, so the frosting has not started to set or dry, and is better able to secure the chocolate planks. Here is a stacked cake, with two of the chocolate strips on....


I continue icing the sides, and carefully placing the chocolate on, so that the chocolate planks are touching each other....


When I have put chocolate around the entire cake, I tie ribbons around the cake. This is a great place to accentuate colors or themes....and also to give an added bit of support to the chocolate.


I noticed on Gigi's cake, that the top of the chocolate was uneven, and had that "natural" look...and that is what I have done. When I made the strips, I made them flat and level on the top and bottom, and then broke the tops to be uneven.

To insert flowers, use straws, cut in half, and insert them into the top of the cake. You can then place the flower stem into the straw. You may want to play around a bit, so that the flowers are set in such a way to cover some of the chocolate edges.


You can make a variety of variations on this...change up the chocolate design, the ribbons, the type of flowers.....Id love to make this with white chocolate sides, and hydrangeas on top...wouldnt that be gorgeous??

Thanks again, Gigi, for the inspiration :)

Valentine's Day 2012

Remember when Valentine's Day meant exchanging mini cards decorated with super heros or Barbie?

It's much more fun to make delicious treats to share with friends.....

My kids each picked out a goodie to give to their classmates;

Andrew picked marshmallow pops!


Christine went for the chocolate covered strawberries.


Elise loved passing out chocolate covered pretzels.


I hope your Valentine's Day was sweet <3

Wednesday, February 8, 2012

Zebra cakes

Ok, now that pinterest exists (I still think googling my interest yields more ideas and pics...but anyways)....I have found some fun new ideas.

I saw this picture of individual cakes, in mason jars, and this one in particular is rainbow themed....


the original poster was Brooke McLay at http://blogs.babble.com/family-kitchen/2011/04/08/rainbow-cake-in-a-jar/

So, anyways, when I saw this, I immediately thought they would be fun to make in a "zebra print" design, because...my daughter loves that, and points out all things zebra print.

It's her birthday party this weekend, so, naturally, I decided to cram this baking experiment into my busy schedule.

Now, one thing you need to know about my blog, if you havent already figured it out....it's for the basic person. My pictures are not professional, I dont fix up my creations, I simply make them, like you would, and the results are not always perfect. My purpose, is to show you how to make fun things at home....even if you arent Martha Stewart.

So....on with the zebra cakes.

I started out with mason jars. I sprayed baking spray in each one...just a little bit.


I made a batch of cake mix and left it white.....


and I made a batch of cake mix and colored it black (you can get all kinds of food colors and Michaels)....


I just alternated black, white, black, white in the jar.


The oven is preheated to 400, and the jars are placed inside a baking pan, with 1/4 water inside. Just put the pan in the oven.....for about 40 minutes (check, and use a skewer to test that they are cooked throughout)


The result, (imperfect) zebra cakes. These will be topped with hot pink, whipped cream on the day of the party.


Im going to put the mason jar lid on each cake, and keep them in the fridge. Then, Ill transport them to the party (with my pastry bags of pink whipped cream) and each child will get their own cake and spoon.

It's different, festive, and fun......

ZEBRA CAKE UPDATE: These were yummy! they look fancy inside too!

Wednesday, November 23, 2011

Thanksgiving Centerpiece

Thanksgiving is such a warm holiday. Fall colors, cornucopias brimming with goods from the harvest, and the fragrance of warm pumpkin pies. It really is a time for remembering what matters most, and appreciating the basics of family, friends, and food.

One of my favorite tablescapes involves mini pumpkins and gourds. I love this idea, because it's colorful, festive and EASY.

You can use gourds and mini-pumpkins of all sizes and colors......Im keeping it simple this Thanksgiving and using just mini-pumpkins.


You want to cut a hole big enough to fit a candle...but not too big, it's nice if the candle fits snugly. The hole doesnt have to look nice, you just want to get the candle in.


Im using plain white votives, but you can use candles of all sizes...candlesticks, votives,...mix and match warm colors.


Place your gourds and pumpkins on a serving tray or platter....add additional garnishment if you would like, fall leaves, colored beads, use your imagination.

Im keeping mine simple, on a cream colored cake platter.....


Once the candles start burning, the wax will start to flow out of them (so make sure you are using a heat safe platter). Some will burn quicker and it starts to look so beautiful when the candles end up at different heights....especially so when using different gourds and a variety of candle sizes and colors.

This is an inexpensive, quick way to add a festive feel to your holiday table.

Saturday, March 5, 2011

Disney Chocolate Treats

Disney is known for fun, excitement and creativity.....so of course, the Disney
Chocolate Shoppe is filled with lots of delicious ideas.

Everyone loves the goodies they are making...just look at the crowd, gathered around to watch the Disney Chocolatiers work their magic:


If you have been reading my blog, you know that the key to amazing chocolate creations is TEMPERING - the process that allows you to dip and mold chocolate. So, of course, the Disney Chocolatiers are using their giant tempering machine....


And once you temper your chocolate, the sky is the limit.....here are some fun apples, marshmallow pops and pretzels, all done up Disney Style.....


Ill post more soon....including the prices of these goodies....talk about a great business!!

Thursday, March 3, 2011

News Flash

What a treat to see my chocolate party featured in the Orange County Register :) I want to invite everyone to "like" my facebook page: Kim's Dove Facebook Page


OC Register article

Let me know if you are interested in having a fun chocolate tasting party.....also, Im looking for gals and guys to join my Dove team. Let me know if you are interested.

My Chocolate Videos